I took this to a Christmas party for my husband's work and I got many compliments and requests. It's a combination of 2 recipes that I tweeked.
1 lb. block cheddar cheese
1 8 oz. Jar Cowboy Candy(candied jalapenos), undrained
2 8oz. packages Neufchatel Cream Cheese
1 cup Best Foods Mayonnaise
4 Tbl. Whipping Cream
Kosher Salt to taste
2 tsp. Sriracha Sauce(more or less depending on heat preference)
1 tsp. garlic powder(or 1 clove garlic crushed)
Crumb Topping
2 cups Panko Bread Crumbs
3/4 cup grated sharp cheddar cheese
1 stick(1/2 cup) melted, but not hot, Butter
Preheat oven to 350'. Spray the blade and inside of the food processor with non-stick spray(this just makes things easier, you can skip if you like). Cut up cheese into 1" pieces and chop in food processor until finely grated. Remove 3/4 cup and set aside. Dump in undrained jar of Cowboy Candy, cream cheese, mayonnaise, and whipping cream. Process/pulse until jalapenos are diced but not pureed. Add salt, garlic powder, and taste! It is good cold too(without the topping)! Add Sriracha Sauce to taste and combine. Spray 2 qt. casserole dish with non-stick spray and add cheesy mix or divide between 2 1 qt. casserole dishes and set aside. In another bowl melt 1 stick of butter on high 30 seconds, it probably won't melt entirely, and that's just perfect. Add Panko bread crumbs and cheddar cheese. Mix with a fork until the mixture resembles an even crumbly mixture. Spread over cheese mixture evenly and bake 15-25 minutes on bottom rack. If the top is not browned, cook another 5-10 minutes on the top rack so it will brown underneath the heat element. Do not over cook or the mayonnaise can separate from the cream and then it looks like a big greasy soupy mess. Serve with chewy bread slices or crackers.
The original recipe can be found HERE.
If you don't have Cowboy Candy on hand(which you are seriously missing out on then!), you can use 2 4oz. cans diced chilies and add some fresh chopped jalapenos.
Saturday, December 10, 2011
Monday, November 28, 2011
Peanut Butter Caramel Apple Cobbler
I didn't measure the ingredients, so feel free to splurge a little if you like cinnamon a little more, or want to add ginger or vanilla. It's an easy recipe to play with and hard to go wrong.
3lbs. apples, peeled/cored/sliced*
2 Tbl. cornstarch
2 Tbl. lemon juice
1-2 tsp. ground cinnamon
1/2 tsp. ground nutmeg
1/2 tsp. ground cardamom
1 tsp. kosher salt
1/4 cup sugar
1/3 cup smooth peanut butter
1/3 cup Lyle's Golden Syrup(maple, agave, or brown rice would also work)
1 cup flour
1 cup rolled oats
2 cups brown sugar
1 stick(1/2 cup) cold butter
1/3-1/2 cup chopped dry roasted salted peanuts
Preheat oven to 350'. Spray the bottom and sides of a deep 9x13" baking pan with non-stick spray. In a large bowl, coat apples evenly with lemon juice, cornstarch, cinnamon, nutmeg, cardamom, salt, & sugar. Spread apples evenly in baking pan. Spray a small microwave proof bowl or measuring cup with non-stick spray. Pour in Golden Syrup and peanut butter. Microwave on high 30 seconds and stir until smooth. Drizzle evenly over apple slices. In a large bowl combine flour, oats, brown sugar, peanuts, and cold butter cut into small pieces. Use a pastry blender to cut butter into the mixture until resembling fine crumbs. Spread evenly over apples and peanut butter mixture. Bake 45 minutes. Then cover loosely with foil and bake another 15 minutes.
Let cool and serve over vanilla ice cream or with whipping cream.
* I used a mix of Granny Smith and Pink Lady apples, yum!
Friday, November 18, 2011
Breaking Dawn Part 1

You're safe, no spoilers, I don't want to ruin all the fun. And that's exactly what it is, FUN! I've gone to the midnight showing of all four Twilight movies now because it is SO fun. The books became a great way to find something common with my oldest daughter. And then the youngest, well, she refused to read them. However she did manipulate me somehow to pay her $1 per chapter for Twilight, which was the exact amount she needed saving up for something she wanted. It had no everlasting psychological effects though, she hasn't read the other ones, yet. She is however hooked on seeing the movies. Last night was no exception, it was a blast watching it in a movie theater filled with all the energy and excitement.
I bought my tickets the first part of November and we were supposed to be in Stadium 10. At that time the cashier told us there were 60 seats sold in 1 and 45 in 10, but last night they had to open up more and it just gets busier and busier with every showing. So, we ended up being in Stadium 8 with mostly high school/college kids. Just a few of us moms. Along with extra showings came extra boys. When Twilight came out I noticed a handful of men, not teenage boys(they're kind of dumb that way). The men were also googly eyed over the women they were with. Smart. (Hoping the hubby gets a hint before the BD.2 comes out) But last night, the boys were out to be goofballs. It's no biggie, it's expected, they're in school with the girls all day anyways, and it's kind of a party atmosphere. However, I really could have done without the loud fart sound at the end of the movie while we're all hushed in anticipation of something we all knew was coming. I giggled at the fart last night with the rest of the audience, but this morning I'm irritated, maybe it's because I'm still tired. Girls, leave your "boys" at home. Women, your mature dates are welcome.
Now, having visually wet noodle slapped those boys, did I take this movie seriously? No. I thought it was a big can of cheese whiz, but so was the book! It was fun, I wondered how these scenes would play out. Taylor has uh, well, he's gotten older and I don't feel as bad now getting a few pitter pats when he's walking around with a tight shirt on. He was more covered up this time, and it didn't matter, the kid is still going to rule the screens, watch. Kind of the same way Benjamin Bratt took off. Oh, yeah, I told myself I wasn't going to even bother with Private Practice this year, but then I decided I really need to watch the Bratt every week. The acting did get MUCH better with this film. Forget Team Jacob or Team Edward, I'm Team Charlie now that I've seen him in a tux. ;) Besides, Jacob and Edward are definitely taken.
I can't wait for Part 2. Bella is supposed to come back and kick some...."booty". And I will be there at midnight with bags under my eyes and $ store candy in my purse(I forgot it last night though!).
Tuesday, November 15, 2011
Home Canned Apple Pie Filling

18 cups(about 6 lbs.) peeled, cored, sliced apples
3 cups white granulated sugar
1-1 1/2 cups brown sugar
1 cup corn starch
1 Tbl. ground cinnamon
1/2 tsp. ground all spice
1/2 tsp. ground cardamom
1 tsp. kosher salt
1/2 cup lemon juice
1 64 oz. bottle unsweetened apple juice or cider
2 cups water
2 tsp. pure vanilla extract(or 1 tsp. double strength)
1 drop doTerra Ginger Essential Oil
1 drop doTerra Wild Orange Essential Oil
7 Quart Sized Jars with disks and rings for canning
Peel apples. Segment peeled apples using an apple corer/wedger* and place in a large bowl with water and lemon juice(1/4 cup per 4 cups cool water), set aside. Bring a large pot of water to boil to blanch apple wedges for one minute, 6 cups at a time. Set aside apples in another large bowl and keep warm(I just covered with a towel). In a very large pot combine sugars, cornstarch, dry spices, and whisk. Add apple juice or apple cider, lemon juice, and water and bring to a boil. When it starts to thicken add apple wedges and cook another 5-10 minutes until thick and apples are heated through. Turn off heat and stir in vanilla, and essential oils. Ladle apples and syrup into sterilized hot jars, leaving 1" head space. Run a chopstick or canning tool through to remove bubbles. Wipe rims and add disks and rings. Process 25 minutes, or as recommended based on your altitude. Remove and let cool overnight. If any have not sealed within one hour, refrigerate and use within 2 weeks.
Recipe yields 6-7 quart jars. One quart for a 9" pie plate.
Do not use if seal breaks, if lid is bulging, or it smells. A few of my jars oozed pie filling a little while processing, but my canning expert friend assures me this is okay so long as they seal properly. Just wipe down any residue being careful not to break any seals. All but one sealed properly. Oh darn, if we MUST make a pie.

Whisk sugar, corn starch, and dry spices before adding apple juice/cider, lemon, and water.


Wednesday, November 2, 2011
Healthy Cherries Gracias Frozen Yogurt

I love Greek Yogurt, specifically plain Greek Yogurt. It's rich in flavor and tastes so good with just an add-in or two. I had quite a bit, forgetting I had already stocked up so I needed to do something with it. I decided to try make Frozen Yogurt and this is what I came up with.
2 cups Frozen Dark Cherries
1/2 cup Apple Juice(not cocktail)
1/4 cup sugar(optional, you can also try your favorite non-calorie sweetener or honey)
1/2 cup each White & Dark Chocolate Chips, finely chopped
2 tsp. Vanilla Bean Paste
3 cups Plain Greek Yogurt
In a small saucepan combine cherries, apple juice, and sugar(optional). Bring to a boil and then reduce to simmer on low for 20 minutes, stirring and smashing frequently until it is reduced about 1/2. Let cool slightly and process in small food processor or blender until almost smooth. You're just trying to make sure there are no large pieces of skin. Allow to cool, refrigerate to speed this along. In a large mixing bowl, combine yogurt, chocolate chips, vanilla, and cooled mixture. Refrigerate for at least 1 hour to overnight. Add to ice cream maker according to manufacturer directions. Optional: Add toasted slivered almonds, additional dark chocolate chunks, or brownie pieces the last 5 minutes of mixing ice cream.
Monday, October 31, 2011
Apple Cranberry Sauce
I read a description online of a gourmet shop with these ingredients, well, almost all of them. Hers called for Allspice, I used Ginger instead. I of course had no measurements, but I tried to keep track so I could replicate this again in case we liked it. We REALLY liked it! And it's a gorgeous color too.

I used a 20 qt. large stock pot I believe.
Granny Smith Apples(approx. 20 medium size)
Fuji Apples (8 large size)
4 limes, juiced(microwave for 30 seconds first)
2-4 cups water(depends on how thick you like it)
1 bag fresh cranberries
sugar(optional, I thought 3 cups was perfect)
1 Tbl. ground cinnamon
1 tsp. ground ginger
1 tsp. ground nutmeg
1 tsp. kosher salt
2-3 drops doTerra Wild Orange Essential Oil
Add 2 cups water and lime juice to large stock pot. Peel, core, slice, and quarter or half apples. Add the apples to the pot stirring often so that all of the apples are coated with the lime juice. They cook down as you keep adding so you can add more than you think you will be able to fit. If you need more water, add as necessary. Rinse and pick through the bag of cranberries for any questionable berries and toss the gross ones. When the pot is filled about half way, add the prepared cranberries. Add remaining apples. Stir and stir until all of the apples are tender and the berries are done popping. Remove from heat and using a long handled immersion blender blend until smooth, or your desired consistency. Bring back to a low rolling boil/simmer. Add cinnamon, ginger, nutmeg, and salt and taste. Add sugar if you desire to your liking. Simmer for 5 more minutes. Add doTerra Wild Orange Essential Oil and mix very well.
If you are canning: Remove sterilized jars and fill one at a time while mixture is still slightly bubbling after the low rolling boil for 5 minutes. Top with sealing disc and tighten with ring just until tightened. Process in boiling water with rack for 25 minutes(I'm at 2,600 ft, so you'll have to check your elevation requirements). Remove jars and set on towel to remain undisturbed for 24 hours. Check the sealing discs though after 1-2 hours to verify all jars have been sealed by gently pushing down in center. This yielded 7 1qt. jars.

If you are not canning, this would be great in the freezer as well. Use this sauce as a yogurt mixin or topping for ice cream. Or just plain like in my old book.

I used a 20 qt. large stock pot I believe.
Granny Smith Apples(approx. 20 medium size)
Fuji Apples (8 large size)
4 limes, juiced(microwave for 30 seconds first)
2-4 cups water(depends on how thick you like it)
1 bag fresh cranberries
sugar(optional, I thought 3 cups was perfect)
1 Tbl. ground cinnamon
1 tsp. ground ginger
1 tsp. ground nutmeg
1 tsp. kosher salt
2-3 drops doTerra Wild Orange Essential Oil
Add 2 cups water and lime juice to large stock pot. Peel, core, slice, and quarter or half apples. Add the apples to the pot stirring often so that all of the apples are coated with the lime juice. They cook down as you keep adding so you can add more than you think you will be able to fit. If you need more water, add as necessary. Rinse and pick through the bag of cranberries for any questionable berries and toss the gross ones. When the pot is filled about half way, add the prepared cranberries. Add remaining apples. Stir and stir until all of the apples are tender and the berries are done popping. Remove from heat and using a long handled immersion blender blend until smooth, or your desired consistency. Bring back to a low rolling boil/simmer. Add cinnamon, ginger, nutmeg, and salt and taste. Add sugar if you desire to your liking. Simmer for 5 more minutes. Add doTerra Wild Orange Essential Oil and mix very well.
If you are canning: Remove sterilized jars and fill one at a time while mixture is still slightly bubbling after the low rolling boil for 5 minutes. Top with sealing disc and tighten with ring just until tightened. Process in boiling water with rack for 25 minutes(I'm at 2,600 ft, so you'll have to check your elevation requirements). Remove jars and set on towel to remain undisturbed for 24 hours. Check the sealing discs though after 1-2 hours to verify all jars have been sealed by gently pushing down in center. This yielded 7 1qt. jars.
If you are not canning, this would be great in the freezer as well. Use this sauce as a yogurt mixin or topping for ice cream. Or just plain like in my old book.
Tuesday, October 25, 2011
Individual Chicken Pot Pies

4 cooked chicken breasts, cooked & diced
2 cans 98% fat free cream of chicken soup
1/2 container of Philadelphia Creme Original Flavor
8oz. fat free half n half(or whipping cream for really rich sauce)
1 2/3 cup shredded cheddar cheese
2 1/2 cups chopped frozen veggies, thawed(leftovers are perfect)
Salt & Pepper to Taste
1 Tbl. Parsley
1/2 tsp. Turmeric
1/2 tsp. onion powder
1 minced garlic clove
3 packages Pillsbury Grands Butter Biscuits
Makes 12. Mix all of the ingredients, except the biscuits(duh), in a large bowl. Add more liquid as needed, I added a little of the squash soup from last night(sneaky). Spray 2 large muffin pans(mine only has 6 spots in each) with non-stick spray. Flatten 12 biscuit dough and shape into muffin tins. Fill dough with chicken and cheese mixture. Separate 6 biscuits in half and flatten slightly. Top each tin and slightly press into tin. Don't worry about them sealing too much. Bake at 375' for 20-25 minutes. Serve hot.
*I had 6 biscuits left over and some chicken mixture so I used the leftovers in a small casserole dish for 2. I pressed the dough together, using 4 biscuits for the crust and 2 for the top. Baked for 25-30 minutes.


Monday, October 24, 2011
Curry Butternut Squash Soup

1 Large Onion, diced
4 Whole Cloves Garlic, peeled
1 Tbl. Butter
1 Tbl. Coconut Oil
S&B Hot Curry Sauce, 2 pieces*
1 Butternut Squash, peeled, seeded, & cubed into 1" pieces
4 Granny Smith Apples, peeled, cored, sliced
1 Can Cannelini Beans, undrained
Vegetable or Chicken Stock
Pinch of Red Pepper Flakes
Toppings:
Sour Cream, Plain Greek Yogurt, Toasted Coconut, Toasted Almonds, Croutons, etc....
Put diced onion, garlic, butter, and coconut oil in large slow cooker sprayed with non-stick cooking spray. DO NOT use slow cooker bags you will need the immersion blender and it will shred your bag and ruin your recipe(yucky plastic soup, no thank you). Turn the slow cooker on high and cover for one hour, stirring occasionally, until onions are translucent and beginning to brown. Add apples, squash, curry squares, beans, red pepper flakes, and just enough stock to come up to the bottom of the top layer of squash cubes. Cook on high for 5-6 hours, until squash is very tender. Turn slow cooker off, fish out the garlic cloves and discard. Use the immersion blender to puree until smooth, or use blender in batches. I prefer the immersion blender to avoid burns. Return to slow cooker to warm until ready to eat. Serve with a variation of toppings.

*There are 5-4 squares/rectangles per package. I found 2 to be the perfect heat, and I like things hot. So, you may want to start off with one square and add the other after taste testing, they do dissolve pretty fast.
Tuesday, October 11, 2011
Mushroom Risotto
This was dinner tonight. I missed the photo because we just couldn't wait to dig in.
2 1oz. packages dried mushroom blend, or your favorites*, chopped
4 Tbl. butter or reserved bacon grease
1 medium onion, diced
2 8oz. packages sliced, cremini mushrooms
2 cloves crushed garlic
splash of olive oil
fresh ground pepper
kosher salt, to taste
red pepper flakes, to taste
2 cups arborio rice
2 bottles non-alcoholic beer(you can us regular beer if you don't mind)
5 cups good beef stock(or use veggie broth)
3-4 cups reserved liquid from re-hydrating mushrooms
Grated Parmesan Cheese and sliced green onions or parsley for toppings.
Get all of your ingredients together, because you do not want to step away once you start this. Trust me. You need approximately 9-10 cups of liquid. Feel free to half this, but I promise, this will be devoured quickly. Pour 4 cups boiling water over dried mushrooms and set aside, allow to re-hydrate for 20 minutes, at least. Heat a very large deep frying pan and add bacon grease or butter and a splash of olive oil(to prevent burning). Add onion and cover, reduce temperature, and cook stirring often until translucent. Drain mushrooms, reserving the liquid. Measure 4 cups and add to a medium saucepan. Add hydrated mushrooms and fresh mushrooms, garlic, a large pinch of salt, fresh ground pepper, and red pepper flakes. Mix well and cover, reduce heat if needed. Cook, stirring often until fresh mushrooms cook down and reduce in size. Add beef stock to mushroom stock in a saucepan and heat to boil and then turn to low for simmering. Add uncooked arborio rice to mushroom mixture and stir until rice is coated and edges start to turn translucent. Add one bottle of beer and stir until it is absorbed. Add second bottle of beer and stir until it is absorbed again. Add beef/mushroom stock, one cup at a time stirring constantly until liquid is absorbed. Repeat until all liquid is incorporated. Add more kosher salt and pepper to taste as needed. Cover and let rest 3-5 minutes. Serve with fresh grated Parmesan cheese and sliced green onions.
* The blend I used has porcini, shitake, morel, oyster, and lobster mushrooms from Monterey Mushrooms
**The non-alcoholic beer goes better with beef stock than the white wine I had on hand. I've also made this using red wine though and it's seriously delish!
Monday, October 3, 2011
Slow-Cooker French Onion Soup

Mise en Place
(Unfortunately my camera died before I could take any more pics. Email me or leave a comment if the directions aren't clear.)
I've never liked French Onion Soup, I've just never found one that didn't taste like canned beef broth. So I decided to try THIS recipe. It's fall and I love my husband, and it's relatively healthy. I followed the recipe pretty darn close, except, I used beef stock I had reserved in my freezer and some from our pot roast last night. It's a lot of beef stock. But well worth it. I used non-alcoholic beer(2 bottles for tasty measure) so it has great flavor.
I tweaked the bread slightly. First, toast the bread under the broiler for a few minutes on each side. This helps prevent the bread from becoming instantly gummy. Spread one side lightly with one clove of roasted garlic. I made 2 bulbs of roasted garlic today and they spread like "buttah". Ladel some soup into the bowl, then plop the toasted bread garlic side up on top of the Onion Soup. Place a slice of Swiss Cheese or sprinkle generously with grated Gruyere. It's okay to overlap. Broil for 2-3 minutes, until cheese starts to bubble and brown. Serve very carefully as bowl will be very hot.
This would be a FANTASTIC get together dish. Just toast up the bread as above, on a cookie sheet with the garlic and cheese. Leave on a side plate for people to top their soups as they dish it up. (We had a funky schedule tonight with meetings and sports, so I did this for the kiddos that came home later, it worked)
Slow-Cooker French Onion Soup
(adapted from http://www.howsweeteats.com)makes 8-10 servings
4 med. sweet onions, sliced thin
3 garlic cloves, pressed
1/4 cup of butter, sliced into pats
2 tablespoons good balsamic vinegar
2 tablespoons brown sugar
1/4 cup flour
2 bottles non-alcoholic beer(such as O'Doul's)
8 cups GOOD beef stock
1 Tbl. dried thyme
1 tsp. fresh ground black pepper
1/2-1 teaspoon kosher salt
Sourdough or French bread(stale works best)
gruyere cheese, sliced or grated
Add onions, garlic, brown sugar, butter, salt and balsamic and mix until combined in a large slow-cooker. Cover and let cook on high for 60-90 minutes, stirring every 20 minutes, until onions are translucent and brown on the edges and just caramelized. Sift in flour and stir thoroughly, let sit for 5 minutes with lid on. Sprinkle in Thyme, fresh ground pepper, beer, and stir well. Add in remaining beef stock, and cover. Cook on high for 4 hours, then turn down to low and cook an additional 2-4 hours.
Slice sourdough or French bread into 1" thick slices. Arrange on non-stick cookie sheet and toast each side under broiler. Leave door open slightly and watch closely so they don't burn. Remove from oven and spread each slice with one clove of roasted garlic. Fill soup bowls almost to the top, cover with slice of bread and a handful of grated cheese or slice. Set under the broiler for 2-3 minutes(leave door open so you can watch carefully), or until cheese is bubbly and golden brown. Be careful when serving as bowls will be hot! Sprinkle with fresh parsley or fresh thyme.
Monday, September 19, 2011
Challenge!
I need to kick this up a bit. This is how I cook: I find a recipe, or read the title of the recipe, and go from there. When it comes to baking, I make sure I have equal dry/wet ingredients, but often improvise. For example, a recent recipe I read called for a whopping 1 1/4 cups oil. Holy cow that's a lot when the rest is pretty healthy, so I swapped out 1 cup non-fat greek yogurt and used 1/4 cup virgin coconut oil. Gave the muffins a sweeter and denser taste, and healthier oil. I experiment without deviating too far from the recipe most of the times. And many times a recipe or menu just sound good and I don't even follow a recipe, but I use what I have on hand or turn my kitchen into a lab and experiment until I come up with something I'm satisfied with. I'm fairly good at making recoveries and preventing epic fails. I love Chopped, Challenge, and Iron Chef. If you'd like to challenge me to turning my kitchen into Kitchen Stadium, success or fail, I'll post it.
Tuesday, September 13, 2011
Pear, Carrot, & Ginger Muffins

Ingredients:
1 cup Egg Substitute or 4 Whole Large Eggs
1 cup Non-fat Vanilla Greek Yogurt(or plain)
1/3 cup Coconut Oil or Canola Oil
1 cup Brown Sugar
2 tbl. Gourmet Garden Ginger(or jarred)
1 Tbl. Vanilla
1 cup Whole Wheat Flour
2 cups All-Purpose Unbleached Flour
2 tsp. Baking Soda
2 tsp. Baking Powder
2 tsp. Cinnamon
1 tsp. Kosher Salt
3 medium size Pears, finely diced
2 cups Grated Carrot
Preheat oven to 350' and line 2 12 count cupcake pans with paper liners, or spray generously with non-stick spray. Combine wet ingredients(first 6) in a medium bowl with wire whisk, set aside. Combine dry ingredients(next 6) in a large bowl with another wire whisk. Create a well in the center and add wet ingredients with large rubber spatula, just until mixed. Add pears and carrots and combine gently. Divide into 24 muffin liners and bake 18-23 minutes, until a toothpick comes out clean. Serve warm with maple butter.
I love baking quick breads and muffins using the egg substitutes because they bake up higher and fluffier. And the added benefits of being low or fat free and a much healthier choice.

Monday, August 29, 2011
Spicy Apricot BBQ Sauce

2 pounds apricots, pitted and halved
1 14.5oz. can fire roasted tomatoes, do not drain
1 sm. can tomato paste
3 cups brown sugar
1 ½ cup cider vinegar
1 onion, chopped finely
1 jalapeno, diced small, seeds removed based on heat pref.
3 cloves garlic, minced
1-2 Tbl. Kosher salt
½ tsp. ground black pepper
Pinch of red pepper flakes
2 teaspoons Dijon mustard
Place all ingredients in a slow cooker, cover, cook on high 4-5 hours. Remove lid last hour until slightly reduced. Use immersion blender to puree. Use immediately or store in an airtight container for up to 4 weeks.


Half and pit apricots, and quarter each half.

Spray slow-cooker with non-stick spray, add ingredients.

Stir well, cover, and cook on high 5-6 hours.

It looked a little too soupy so I tilted the lid to vent for about 1 1/2 hours. Don't lean over the slow-cooker or you'll get a vinegar steam bath.

Use immersion blender to puree.
Makes approx. 6 cups. Remove lid to let reduce down if too thin and cook down some more, it was really thick though at this point, perfect!

Yummy over chicken, or anything.
Wednesday, August 24, 2011
Strawberry Angel Food Cookies with Vanilla Balsamic Vinegar

These are really sweet, light, airy, and tart pleasing cookies. I pick up fun vinegars and oils at TJMaxx or Ross all the time. I picked up a Vanilla Balsamic Vinegar and it's this really thick and aged syrup, it's wonderful! Strawberries go great with balsamic vinegar so I had to try this. Add some cocoa powder for a truly decadent cookie. These cookies are crisp on the outside and chewy on the inside. I used home made strawberry freezer jam, but it was too sweet. Reduced sugar or sugar-free jam works best.
1 box angel food cake mix(do NOT add water)
3/4 cup low-sugar or sugar free jam
1 Tbl. Vanilla Balsamic Vinegar(optional)
1/4 cup unsweetened cocoa powder(optional)
Preheat oven to 350'. Line cookie sheet with parchment paper or non-stick foil and spray with non-stick spray(MUST!). Prepare all of the ingredients in a mixer bowl for 1 minute on slow. Scrape sides well and mix another minute. Use a cookie scoop and place 12 cookies per large cookie sheet. Bake 10-12 minutes, until they start to turn golden. Remove from oven and slide parchment onto counter. Wait 1-2 minutes before removing cookies to cooling rack.
I prepared most of the batch pictured below without the cocoa and decided to add that after I had baked most. This recipe makes 4 dozen cookies.

Tuesday, August 23, 2011
Homemade Powdered Laundry Detergent

I found several homemade laundry detergent recipes online, and I've been washing my own laundry using just this basic recipe. I have really dry & sensitive skin and prefer this over any "free" detergents on the market. I haven't noticed any dulling or issues getting stains out. I have never used anything but liquid detergents since I had babies in the house. So, I was nervous switching to the powder. But I prefer this over the liquid now. I put one scoop(1 Tbl.) into the detergent compartment for my HE front loading machine. My clothes smell really nice, it's not overpowering. I LOVE doTerra Essential Oils, Lemon, Wild Orange, or Lavender, or a combination. I buy mine from my sweet friend Crysty, HERE.
Basic Recipe:
1 cup Borax
1 cup Washing Soda
1 BAR of either Kirk's Castille Soap, Fels Naptha, or Zote
10-15 drops doTerra Lemon Essential Oil
The first time I made this I used Fels Naptha soap, it's a large yellow bar, found in the laundry aisle, and specifically designed for laundry. It's really hard and took some muscle to grate it. I ordered the Kirk's Castille Soap online from Amazon.com, I love that site. It was easier to grate and a smaller bar. It's designed for use on people with sensitive skin and rinses clean. It also has a coconut oil base. Neither bars suds very much, so this is safe for the HE washers. I have read you can also use Ivory soap or Dr. Bonners. I chose to try using this powder recipe because it just seems a little more concentrated than the diluted down liquid recipes for homemade detergent. Just a preference, I have no idea if one is better than the other.
~~~~~
Grate the bar of soap on a sheet of wax paper and pour into the base of your food processor. Add 1 cup Borax, 1 cup Washing Soda, and 10-15 drops of your favorite Essential Oil. Process until very fine. Your house will smell unbelievably clean right now.

Divide the contents between 2 16oz. canning jars. Use 1-2 Tablespoons, depending on how dirty your laundry is. I have never used more than 1 Tbl.

The jar on the left is the Fels Naptha version(which is why it's a little yellow in color), and the right is the Kirk's Castille soap recipe version. Takes up so much less space. Store extra jars above in the cupboard. Use fabric softener if you wish, or a dryer sheet.

This is my laundry treatment area. Baskets and bar from Ikea.

Monday, August 22, 2011
Stove Top Cleaning
It works!!!

Minimal effort, patience, and cheap. I have a combination stove top, it's ceramic and propane. I don't really love it, but it came with the house. It looks nice when it's clean, it looks beautiful when it's clean. And all I used is baking soda(Part I) and ammonia(Part II)(not together, I'm sure there is some kind of warning about that). I've bought expensive stove top cleaners, eh. My favorite by Scotch was discontinued years ago. I tried baking soda, it's a mild abrasive, but cuts grease, and voila. Just use a damp non-scratch abrasive pad and baking soda. Baking soda costs nothing compared to store cleaners.
I read HERE, about putting your stove top grates into a Ziploc bag with a little ammonia and letting it sit overnight. Her pics were really amazing and I was willing to try anything. Lemishine in the dishwasher helped a lot, but in the past I'd have to use oven cleaner to get the grates clean, and that was still a ho-hum result. Well, the ammonia in the bag worked. I have double grates and they wouldn't fit in a Ziploc bag, so I just used a plain old plastic trash bag, poured a few Tablespoons of ammonia into the bag and then sealed it up by folding the end over and sealing with a clip. Set them out on the porch overnight. The grates do not need to be sprayed with the ammonia, it's the fumes from inside the bag that break down the gunk on the grates. After 24 hours(I got busy), I pulled one out and DO wear gloves for this. I took a sturdy dish brush and scraped off most of the black gunk(boy am I embarrassed for you to see how awful this thing was!). I rinsed it off with hot water and poured a few Tablespoons of baking soda in the corner of the sink. Use a non-scratch abrasive pad and pick up a little baking soda with it's wet corner. It took very little scrubbing power and the rest of the cooked on crud was off in seconds! Really, hardly put any effort at all into it. And baking soda, what a great tool! Baking soda has become my favorite cleaning product now next to Mr. Clean Erasers. Oh, tried the Mr. Clean Erasers too on the stove top and grates, and it took several of them and they never really cleaned them as well as the baking soda and ammonia technique.
Before:

Put your grate into the bag and pour a little ammonia, I poured about 2 Tbls.

Fold the bag over and snap with a clippy. Allow this to set overnight/24 hours or so in a nice warm sunny spot. The fumes will break down nasty baked on food. And don't ask me how, but I somehow got paint on one of mine, instantly came off after months of cooking it in even more.

It does not come out as clean as what it pictured below. Put some gloves on! Get as much off with a scratch proof nylon brush, scrubby, sponge, etc... At this point you will probably remember like me that you need to call to get your roots done. Sprinkle some baking soda on the areas that still need a little TLC and scrub with brush or sponge. Rinse and voila.
After:

Check out that shine! Baking Soda only baby :)

Just like new, back to the day we moved in 4+ years ago.

Monday, August 1, 2011
Mt. Whitney Recap by Eric

Eric gave a great recap of the events and only some of what he learned on this trip. I'm so grateful for all of the Young Men and Adults that made sure our guys made it back safely. What an experience! These are notes from his speaking assignment on Sunday during our Sacrament service.
Sunday 7/31/2011
Intro
“We’re all going to die.” ~Brother E
“We’re all going to die,” were the first words said as we got in the car at 4:30 in the morning. It was then said by the hour, but as we got higher in elevation it was said more frequently to the point where it was said maybe every 5 minutes. We arrived at the trail head and were disappointed when Mt. Whitney was nowhere to be seen. I figured Ian was right when he said it was just over the hill so we started our trip. From then on we never heard “We’re all going to die.”
On the first day I remembered a scripture 1Nephi 3:7
In other words we will not be tested on something that Christ does not believe we will succeed in. So everything we do we are expected to prevail in. This thought changed my opinion on this trip. I started worried and scared, nervous that we were all going to die. I finished this trip to find that the entire time I was never worried, never once uncertain that we would not finish or be subject to harm or accident.
Brother D would frequently check on everyone asking if we where alright. For the first couple of days I would reply saying “Yes I’m fine.” Or, I’ll be alright.” On Friday when he would ask I replied a little differently saying “No. But that doesn’t matter anymore.” From that point it didn’t matter how I was feeling because I knew we would finish and everyone would be safe.
Friday was what the rangers said to be the worst storm since the 1980s. From the time we reached the summit of Mt. Whitney (11:00) to the time we finished (6:00) it was raining, hailing, snowing, there where lightning strikes every second (one hitting 30 yrds from my dad and Brother E) there were also rock slides, flooding, rivers that seemed to be impossible to cross and no trail.
Knowing that there was no chance of stopping and making camp we continued to travel in these weather conditions. We stopped to pray and after the prayer we found our speed to have increased at least 3 times faster and any pain we had was numbed, maybe from prayer or the fact that whatever was hurting was probably frozen solid.
As we were nearing the end we saw a sign that said Mt. Whitney Portal 1 mile. That sign brought hope and cheer to our group so we followed the trail. We walked maybe 100 yards to find a flooded river that seemed to be impossible to cross. All that hope and cheer was then crushed by the simple river but an unexpected angel appeared, almost perfectly timed. It was a fry cook from the Mt. Whitney portal restaurant. He had found a path that hadn’t been used since the 1907(?). He told us it is a safe trail and then he ran off to help other hikers in danger. We finished the hike safely but nervous for the rest of the hikers. Every single hiker that came down said the exact same thing “Thank God for the fry cook”. Four of the hikers in our group didn’t make it down until the next day but even the next day the fry cook was still up there helping other hikers.
When we stopped and prayed we prayed for something or someone to help us find the way and the fry cook did. Some doubted him and continued to go across the river but those who did follow him made it safely. D&C 4:5 if we have faith and hope then there is no doubt we will make it to the end.
Bear Testimony
Thursday, July 28, 2011
Peanut Butter Mousse Brownies
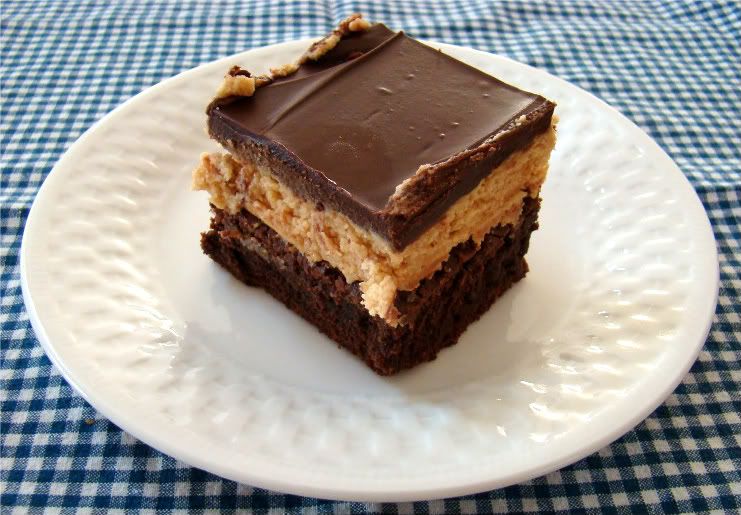
I combined two delicious recipes to make this. I will give credit to both sources at the top of this post because they really deserve all the credit!
The Original Recipes:
Baker's Scrumptious Brownies
Sweet Pea's Peanut Butter Truffle Brownies
Brownies
1 pkg. (8 squares) BAKER'S Unsweetened Chocolate
1 cup (2 sticks) butter or margarine
5 eggs
3 cups sugar
1 Tbsp. vanilla
1-1/2 cups flour
Preheat oven to 375°F. Melt butter in a large glass bowl. Add chocolate squares and microwave on high 30 seconds. Stir until chocolate is completely melted. This takes patience and it's nice to have a second set of hands for this. Cool slightly.
Beat eggs, sugar and vanilla in large bowl with electric mixer and whisk attachment on high speed 10 min. Add slightly cooled chocolate mixture; beat on low speed until well blended. Gradually add flour, mixing until well blended after each addition. Spread into 13x9-inch baking pan, bottom greased only.
Bake 35 min. or until toothpick inserted in center comes out with fudgy crumbs. (Do not overbake.) Cool on counter for 30 minutes, and then refrigerate until cool to the touch.
Spread brownies with Peanut Butter Mousse and chill 30 minutes.
Peanut Butter Mousse
1 cup creamy peanut butter
1/2 cup butter softened(1 stick)
4 cups powdered sugar
2 tsp. vanilla
1/4 cup milk
Combine all ingredients in large mixer bowl of electric mixer and mix on medium, and then high until whipped. Pause to scrape down sides often. Allow to rest 30 minutes covered. Mix again on high for 1 minute. (This is a process I learned in decorating class so you can avoid sifting powdered sugar and get a really smooth frosting.
Spread on brownies and chill 30 minutes. Top with "Ganache" Topping and chill another 30 minutes. Cut into 24 pieces.
Chocolate "Ganache" Topping
1 Pkg. Semi-Sweet Chocolate Chips
1/2 cup Smooth Peanut Butter
1/2 cup butter(1 stick) +2 Tbl. cold butter pieces, separated
In a microwavable glass bowl, melt 1 stick of butter and peanut butter on high 30 seconds. Stir, and heat on high another 30 seconds. Add chocolate chips and stir until chips are melted and chocolate is smooth. Add 2 pats(Tbls.) of cold butter and stir until melted. This gives the "ganache" a shiny and smooth finish. Spread evenly over Peanut Butter Mousse Filling and chill 30 minutes before slicing into 24 pieces.
Subscribe to:
Posts (Atom)