Monday, August 29, 2011

Spicy Apricot BBQ Sauce


2 pounds apricots, pitted and halved
  1 14.5oz. can fire roasted tomatoes, do not drain
  1 sm. can tomato paste
  3 cups brown sugar
  1 ½   cup cider vinegar
  1 onion, chopped finely
  1 jalapeno, diced small, seeds removed based on heat pref.
  3 cloves garlic, minced
  1-2 Tbl. Kosher salt
  ½ tsp. ground black pepper
  Pinch of red pepper flakes
  2 teaspoons Dijon mustard
Place all ingredients in a slow cooker, cover, cook on high 4-5 hours.  Remove lid last hour until slightly reduced.  Use immersion blender to puree. Use immediately or store in an airtight container for up to 4 weeks.


Half and pit apricots, and quarter each half.

Spray slow-cooker with non-stick spray, add ingredients.

Stir well, cover, and cook on high 5-6 hours.  

It looked a little too soupy so I tilted the lid to vent for about 1 1/2 hours.  Don't lean over the slow-cooker or you'll get a vinegar steam bath. 

Use immersion blender to puree.  
Makes approx. 6 cups.  Remove lid to let reduce down if too thin and cook down some more, it was really thick though at this point, perfect!


Yummy over chicken, or anything.

Wednesday, August 24, 2011

Strawberry Angel Food Cookies with Vanilla Balsamic Vinegar


These are really sweet, light, airy, and tart pleasing cookies.  I pick up fun vinegars and oils at TJMaxx or Ross all the time.  I picked up a Vanilla Balsamic Vinegar and it's this really thick and aged syrup, it's wonderful!  Strawberries go great with balsamic vinegar so I had to try this.  Add some cocoa powder for a truly decadent cookie.  These cookies are crisp on the outside and chewy on the inside.  I used home made strawberry freezer jam, but it was too sweet.  Reduced sugar or sugar-free jam works best.

1 box angel food cake mix(do NOT add water)
3/4 cup low-sugar or sugar free jam
1 Tbl. Vanilla Balsamic Vinegar(optional)
1/4 cup unsweetened cocoa powder(optional)

Preheat oven to 350'.  Line cookie sheet with parchment paper or non-stick foil and spray with non-stick spray(MUST!).  Prepare all of the ingredients in a mixer bowl for 1 minute on slow.  Scrape sides well and mix another minute.  Use a cookie scoop and place 12 cookies per large cookie sheet.  Bake 10-12 minutes, until they start to turn golden.  Remove from oven and slide parchment onto counter.  Wait 1-2 minutes before removing cookies to cooling rack.

I prepared most of the batch pictured below without the cocoa and decided to add that after I had baked most.  This recipe makes 4 dozen cookies.


Tuesday, August 23, 2011

Homemade Powdered Laundry Detergent


I found several homemade laundry detergent recipes online, and I've been washing my own laundry using just this basic recipe.  I have really dry & sensitive skin and prefer this over any "free" detergents on the market.  I haven't noticed any dulling or issues getting stains out.  I have never used anything but liquid detergents since I had babies in the house.  So, I was nervous switching to the powder.  But I prefer this over the liquid now.  I put one scoop(1 Tbl.) into the detergent compartment for my HE front loading machine.  My clothes smell really nice, it's not overpowering.  I LOVE doTerra Essential Oils, Lemon, Wild Orange, or Lavender, or a combination.  I buy mine from my sweet friend Crysty, HERE.

Basic Recipe:
1 cup Borax
1 cup Washing Soda
1 BAR of either Kirk's Castille Soap, Fels Naptha, or Zote
10-15 drops doTerra Lemon Essential Oil

The first time I made this I used Fels Naptha soap, it's a large yellow bar, found in the laundry aisle, and specifically designed for laundry.  It's really hard and took some muscle to grate it.  I ordered the Kirk's Castille Soap online from Amazon.com, I love that site.  It was easier to grate and a smaller bar.  It's designed for use on people with sensitive skin and rinses clean.  It also has a coconut oil base.  Neither bars suds very much, so this is safe for the HE washers.  I have read you can also use Ivory soap or Dr. Bonners.  I chose to try using this powder recipe because it just seems a little more concentrated than the diluted down liquid recipes for homemade detergent.  Just a preference, I have no idea if one is better than the other.  

~~~~~

 Grate the bar of soap on a sheet of wax paper and pour into the base of your food processor.  Add 1 cup Borax, 1 cup Washing Soda, and 10-15 drops of your favorite Essential Oil.  Process until very fine.  Your house will smell unbelievably clean right now.  

Divide the contents between 2 16oz. canning jars.  Use 1-2 Tablespoons, depending on how dirty your laundry is.  I have never used more than 1 Tbl.   

The jar on the left is the Fels Naptha version(which is why it's a little yellow in color), and the right is the Kirk's Castille soap recipe version.  Takes up so much less space.  Store extra jars above in the cupboard.   Use fabric softener if you wish, or a dryer sheet.  

This is my laundry treatment area.  Baskets and bar from Ikea.  

Monday, August 22, 2011

Stove Top Cleaning

It works!!!

Minimal effort, patience, and cheap.  I have a combination stove top, it's ceramic and propane.  I don't really love it, but it came with the house.  It looks nice when it's clean, it looks beautiful when it's clean.  And all I used is baking soda(Part I) and ammonia(Part II)(not together, I'm sure there is some kind of warning about that). I've bought expensive stove top cleaners, eh.  My favorite by Scotch was discontinued years ago.  I tried baking soda, it's a mild abrasive, but cuts grease, and voila.  Just use a damp non-scratch abrasive pad and baking soda.  Baking soda costs nothing compared to store cleaners. 

I read HERE, about putting your stove top grates into a Ziploc bag with a little ammonia and letting it sit overnight.  Her pics were really amazing and I was willing to try anything.  Lemishine in the dishwasher helped a lot, but in the past I'd have to use oven cleaner to get the grates clean, and that was still a ho-hum result. Well, the ammonia in the bag worked.  I have double grates and they wouldn't fit in a Ziploc bag, so I just used a plain old plastic trash bag, poured a few Tablespoons of ammonia into the bag and then sealed it up by folding the end over and sealing with a clip.  Set them out on the porch overnight.  The grates do not need to be sprayed with the ammonia, it's the fumes from inside the bag that break down the gunk on the grates.  After 24 hours(I got busy), I pulled one out and DO wear gloves for this.  I took a sturdy dish brush and scraped off most of the black gunk(boy am I embarrassed for you to see how awful this thing was!).  I rinsed it off with hot water and poured a few Tablespoons of baking soda in the corner of the sink.  Use a non-scratch abrasive pad and pick up a little baking soda with it's wet corner.  It took very little scrubbing power and the rest of the cooked on crud was off in seconds!  Really, hardly put any effort at all into it.  And baking soda, what a great tool!  Baking soda has become my favorite cleaning product now next to Mr. Clean Erasers.  Oh, tried the Mr. Clean Erasers too on the stove top and grates, and it took several of them and they never really cleaned them as well as the baking soda and ammonia technique.

Before:

Put your grate into the bag and pour a little ammonia, I poured about 2 Tbls.

Fold the bag over and snap with a clippy.  Allow this to set overnight/24 hours or so in a nice warm sunny spot.  The fumes will break down nasty baked on food.  And don't ask me how, but I somehow got paint on one of mine, instantly came off after months of cooking it in even more. 

It does not come out as clean as what it pictured below.  Put some gloves on!  Get as much off with a scratch proof nylon brush, scrubby, sponge, etc...  At this point you will probably remember like me that you need to call to get your roots done.  Sprinkle some baking soda on the areas that still need a little TLC and scrub with brush or sponge.  Rinse and voila. 

After:

Check out that shine!  Baking Soda only baby :)

Just like new, back to the day we moved in 4+ years ago.


Monday, August 1, 2011

Mt. Whitney Recap by Eric


Eric gave a great recap of the events and only some of what he learned on this trip.  I'm so grateful for all of the Young Men and Adults that made sure our guys made it back safely.  What an experience!  These are notes from his speaking assignment on Sunday during our Sacrament service.  

Sunday 7/31/2011
Intro
            “We’re all going to die.” ~Brother E
“We’re all going to die,” were the first words said as we got in the car at 4:30 in the morning.  It was then said by the hour, but as we got higher in elevation it was said more frequently to the point where it was said maybe every 5 minutes. We arrived at the trail head and were disappointed when Mt. Whitney was nowhere to be seen. I figured Ian was right when he said it was just over the hill so we started our trip. From then on we never heard “We’re all going to die.”
             On the first day I remembered a scripture 1Nephi 3:7
In other words we will not be tested on something that Christ does not believe we will succeed in.  So everything we do we are expected to prevail in. This thought changed my opinion on this trip. I started worried and scared, nervous that we were all going to die.  I finished this trip to find that the entire time I was never worried, never once uncertain that we would not finish or be subject to harm or accident.
             Brother D would frequently check on everyone asking if we where alright. For the first couple of days I would reply saying “Yes I’m fine.” Or, I’ll be alright.”  On Friday when he would ask I replied a little differently saying “No.  But that doesn’t matter anymore.”  From that point it didn’t matter how I was feeling because I knew we would finish and everyone would be safe.
Friday was what the rangers said to be the worst storm since the 1980s.  From the time we reached the summit of Mt. Whitney (11:00) to the time we finished (6:00) it was raining, hailing, snowing, there where lightning strikes every second (one hitting 30 yrds from my dad and Brother E) there were also rock slides, flooding, rivers that seemed to be impossible to cross and no trail.
             Knowing that there was no chance of stopping and making camp we continued to travel in these weather conditions. We stopped to pray and after the prayer we found our speed to have increased at least 3 times faster and any pain we had was numbed, maybe from prayer or the fact that whatever was hurting was probably frozen solid.
As we were nearing the end we saw a sign that said Mt. Whitney Portal 1 mile. That sign brought hope and cheer to our group so we followed the trail. We walked maybe 100 yards to find a flooded river that seemed to be impossible to cross. All that hope and cheer was then crushed by the simple river but an unexpected angel appeared, almost perfectly timed. It was a fry cook from the Mt. Whitney portal restaurant. He had found a path that hadn’t been used since the 1907(?).  He told us it is a safe trail and then he ran off to help other hikers in danger. We finished the hike safely but nervous for the rest of the hikers. Every single hiker that came down said the exact same thing “Thank God for the fry cook”.  Four of the hikers in our group didn’t make it down until the next day but even the next day the fry cook was still up there helping other hikers.
When we stopped and prayed we prayed for something or someone to help us find the way and the fry cook did. Some doubted him and continued to go across the river but those who did follow him made it safely. D&C 4:5 if we have faith and hope then there is no doubt we will make it to the end.
Bear Testimony

Thursday, July 28, 2011

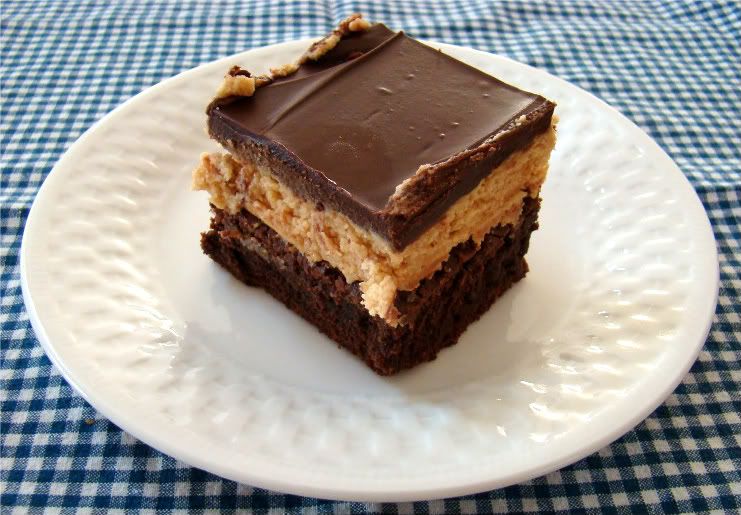
Peanut Butter Mousse Brownies


I combined two delicious recipes to make this.  I will give credit to both sources at the top of this post because they really deserve all the credit!

The Original Recipes:
    Baker's Scrumptious Brownies
    Sweet Pea's Peanut Butter Truffle Brownies

Brownies
1 pkg. (8 squares) BAKER'S Unsweetened Chocolate
1 cup (2 sticks) butter or margarine
5 eggs
3 cups sugar
1 Tbsp. vanilla
1-1/2 cups flour

Preheat oven to 375°F. Melt butter in a large glass bowl.  Add chocolate squares and microwave on high 30 seconds.  Stir until chocolate is completely melted.  This takes patience and it's nice to have a second set of hands for this. Cool slightly.
 
Beat eggs, sugar and vanilla in large bowl with electric mixer and whisk attachment on high speed 10 min. Add slightly cooled chocolate mixture; beat on low speed until well blended. Gradually add flour, mixing until well blended after each addition. Spread into 13x9-inch baking pan, bottom greased only.
Bake 35 min. or until toothpick inserted in center comes out with fudgy crumbs. (Do not overbake.) Cool on counter for 30 minutes, and then refrigerate until cool to the touch. 

Spread brownies with Peanut Butter Mousse and chill 30 minutes.
 
Peanut Butter Mousse
 
1 cup creamy peanut butter
1/2 cup butter softened(1 stick)
4 cups powdered sugar
2 tsp. vanilla
1/4 cup milk
Combine all ingredients in large mixer bowl of electric mixer and mix on medium, and then high until whipped.  Pause to scrape down sides often.  Allow to rest 30 minutes covered.  Mix again on high for 1 minute.  (This is a process I learned in decorating class so you can avoid sifting powdered sugar and get a really smooth frosting.  
 
Spread on brownies and chill 30 minutes.  Top with "Ganache" Topping and chill another 30 minutes.  Cut into 24 pieces.

Chocolate "Ganache" Topping
1 Pkg. Semi-Sweet Chocolate Chips
1/2 cup Smooth Peanut Butter
1/2 cup butter(1 stick) +2 Tbl. cold butter pieces, separated

In a microwavable glass bowl, melt 1 stick of butter and peanut butter on high 30 seconds.  Stir, and heat on high another 30 seconds.  Add chocolate chips and stir until chips are melted and chocolate is smooth.  Add 2 pats(Tbls.) of cold butter and stir until melted.  This gives the "ganache" a shiny and smooth finish.  Spread evenly over Peanut Butter Mousse Filling and chill 30 minutes before slicing into 24 pieces.

Friday, July 15, 2011

Going Green

There's a little more to this being "green" thing than I expected.  I'm not talking granola green, I'm talking "cha-ching" green.  But, it turns out, granola AND cha-ching, work really really well together.  Green Granola?

Here's what I did.  I found a recipe online for homemade dishwasher detergent.  I don't have really hard water, but the money savings was awesome.  I have a great dishwasher(Bosch) so it really does do a nice job.  But, I thought, "What the heck?  I'm only out a few bucks if it doesn't work."  And it did!  It works great.  I don't think I'll go back to store bought detergent again.  My dishwasher looks bright and shiny, it really cleans the dishes and stained plastic ware, and it smells good afterwards, unlike the store bought $$$$ stuff.  Here's the original post HERE.

And any time I can use my Cricut, even better yet.

And I don't have clip coupons for dish soap anymore!

Homemade Dishwasher Detergent
2 cups Borax
2 cups Arm & Hammer Washing Soda
2 cups LemiShine or 12 packets unsweetened lemonade Koolaid(ONLY  lemonade flavor)
1 cup Kosher Salt
Combine all ingredients in a bowl.  There is a chemical reaction of some kind that makes these ingredients clump up and get hard.  So, just set aside the large bowl on a counter away from children and pets.  Give it a good stir every once in a while for a few days.  Then store on the countertop in a sealed container.

Use Vinegar as a rinse agent.

I also just went paperless with my insurance for email Explanation of Benefits instead of mostly useless papers I just have to find a place to file, and find the time, and shred when I'm done, which also equates to wasted crap in my garbage can.  Which saves me cha-ching again, along with the added benefit of less crap in the landfills.  Which again, I'm not granola on it, but I do feel better about that.

Apps!  Check this out.  There are apps out there for your iPhone and other smart phones that save the barcodes right on your phone.  Instead of all those little member cards and key fobs(that always rip off), you just open up your app, and show the cashier, gym, rental places, your little barcode on your phone.  Just search "Key chain app".

I know there's more I've done lately, that have been little ah-ha moments for me.  I do bake my own bread most of the time.  I make a lot from scratch.  It just tastes better too.  Next up just may be homemade laundry detergent.  My daughter and I both have really sensitive skin and it can be downright painful, especially this time of year.

Saturday, June 11, 2011

Triple Chocolate Fluffernutter Cookie Sandwiches


It's a mouthful, huh?  Yeah, you will be stuffing your mouth full of these. 

Cookies:
1 Package Devils Food Cake Mix
1 cube(1/2 cup) softened butter
2 squares(2 oz.) unsweetened chocolate squares
2 Tbl. Canola Oil
1 Egg, slightly beaten
1 cup mini semisweet chocolate chips

Preheat oven to 350' degrees.  In a large bowl, add butter and chocolate squares and microwave on high 30 seconds.  Stir until squares are melted and incorporated into butter.  If you need to, microwave again in 15 second increments.  You don't want the butter to be hot, just enough to melt the chocolate.  When incorporated and cooled to luke warm, add oil and egg(you don't want the egg to scramble).  Stir in cake mix and then stir in chocolate chips.  Using a Tbl. size cookie scoop place 2" apart on parchment lined cookie sheets .  Take a flat glass or small bowl and spray bottom with non-stick spray and slightly flatten.  Bake 8-10 minutes and remove to cookies to cooling rack.  Allow to cool completely.  Makes approx. 36 cookies.

Frosting:
This is easy, and SO delicious.  Use the 7-Minute Brown Sugar Frosting.  Add about 1 cup Natural Peanut Butter to 1/2 of the frosting recipe.   Add to large tipped frosting piping bag.  Generously pipe the bottom of one cooled cookie and sandwich with the bottom of another one close in size.  Allow to set up in refrigerator or freezer for a few hours.  The chocolate cookie gets softer and easier to eat in a few hours.

7-Minute Brown Sugar Frosting

Ingredients:
  • 1 1/2 cups brown sugar
  • 2 large egg whites(1/2 cup "Just Whites" pasteurized from carton works great)
  • 6 tablespoons water
  • dash salt
  • 2 teaspoons vanilla or vanilla bean paste
Preparation:
Add brown sugar, egg whites, water, and salt in bowl of standing mixer. Put on top of double boiler over boiling water.  Hold bowl steady using an oven mitt(no burns!).  Beat sugar and egg mixture with whisk constantly until mixture is hot to the touch and starts to thicken.  Remove from heat and position bowl in stand mixer with whisk attachment.  Whip on high until mixture forms strong peaks and is dramatically lighter in color.  Add vanilla.  Continue beating until frosting is thick enough to spread.  Makes enough to frost a 2 layer cake.


Thursday, June 9, 2011

7-Minute Brown Sugar Frosting

Ingredients:
  • 1 1/2 cups brown sugar
  • 2 large egg whites(1/2 cup "Just Whites" pasteurized from carton works great)
  • 6 tablespoons water
  • dash salt
  • 2 teaspoons vanilla or vanilla bean paste
Preparation:
Add brown sugar, egg whites, water, and salt in bowl of standing mixer. Put on top of double boiler over boiling water.  Hold bowl steady using an oven mitt(no burns!).  Beat sugar and egg mixture with whisk constantly until mixture is hot to the touch and starts to thicken.  Remove from heat and position bowl in stand mixer with whisk attachment.  Whip on high until mixture forms strong peaks and is dramatically lighter in color.  Add vanilla.  Continue beating until frosting is thick enough to spread.  Makes enough to frost a 2 layer cake.

Tuesday, June 7, 2011

Pizza Pull Apart Monkey Bread

Here is the link I used for inspiration.  HERE  I did a few things different.

Here is the recipe I used to make the dough, HERE, EZ White Bread.  I do make my own bread, I double the recipe.  Half went to a loaf of sandwich bread, and the rest for the Pizza Pull Apart Monkey Bread. 


EZ White Bread
1 1/8 cups warm water
1 3/4 – 2 tsp active dry yeast
2 Tblsp sugar (you can use a little more sugar if you like your dough a little sweeter)
3 cups flour
1 Tblsp vital wheat gluten (remember you don’t need as much gluten if you’re not using whole wheat flour)
1 tsp salt
2 Tblsp nonfat dry milk
1 1/2 Tblsp butter/margarine or oil
1/4 cup potato flakes
(you don’t really need vinegar for white bread, remember the dough enhancers are primarily needed for whole wheat bread)
Add the ingredients in the order listed into a mixer bowl (like a kitchen-aid) with a dough hook attachment and mix on low for 10-12 minutes. Or mix it on the dough cycle in your bread machine.
After all the mixing is complete, if the dough still seems too gooey and you are unable to handle it, add 1 Tblsp flour at a time, and mix after each addition until the dough is manageable with your hands.
Let rise 45 mins -1 hour, punch down and use to make bread, cinnamon rolls, cookie sheet pizza, rolls, or anything else you can think of! Let rise after you have made your creation and bake according to the direction of the recipe you are making.
If you are making it into bread, form into a loaf at this time, place in a loaf pan, let rise in a warm place 45 min -1 hour and bake 375 degrees for 20-25 minutes until golden brown and sounds hollow when lightly tapped.
If you are making this recipe in a bread machine. Follow your bread machine’s directions and add the ingredients in the order listed in their recommendations. (only one loaf will fit in a bread maker)


Preheat oven to 350'.  This is so easy!  Grease a large angel food cake or bundt pan(I used a Pampered Chef Stoneware Bundt Pan, it's bigger than most).  Poor just enough spaghetti sauce on the bottom to lightly cover the bottom of the pan, it doesn't need to completely cover.  Drop about a dozen pieces of pepperoni randomly.  This is where a 2nd set of hands comes in nicely, have them glove up.  I had about 3 cups of spaghetti sauce leftover(Round 2 from freezer).  Warm it up in a medium size bowl.  Punch down the dough and knead for a few minutes.  Pull pieces of dough off in 1" chunks.  No need to roll or make look pretty, the more "raw" edges, the easier it is for the dough to soak up the sauce.  Put the pieces in the sauce a few at a time and have your kitchen buddy cover the bottom of the pan in one layer of dough(about half of the recipe).  Top with grated mozzarella(I used cheddar), sprinkle with a little Italian Seasoning, top with another layer of pepperoni slices.  Coat remaining dough pieces in sauce and cover the bottom layer.  Top with cheese and then remaining spaghetti sauce.  Just lay a large enough piece of foil to cover the pan, but do not seal around the edges.  This is just to prevent burning.  Bake for 50-60 minutes, until recipe has doubled in size.  You can remove the foil the last 10 minutes to brown up if the dough hasn't browned.  Mine overflowed a little so you may want to bake on a cookie sheet, but you'll need to add a little time. 

When it comes out of the oven, gently go around edges to free bread from pan.  Invert on a large platter.  If you're one of my children, serve with ranch dressing to dip.  This is MESSY finger food, but finger lickin' good.  :)

Thursday, June 2, 2011

Please Remove Your Shoes


Most used words in the summer, enforced with vinyl(Cricut).

Wednesday, June 1, 2011

Low Fat Orange Shrimp

Sorry, no picture.  I wasn't expecting to like it this much and didn't think to snap a shot.

4 oz. Raw Jumbo Shrimp, peeled & deveined(I used jumbo size)
2 envelopes True Orange(LINK)
2 Tbl. No Sugar Added Applesauce
1/2-1 tsp. Spicy Mustard(I used Southwestern Style)
1-2 cloves Crushed Garlic
Salt & Pepper

In a small bowl combine applesauce, mustard, and True Orange in a small bowl and set aside.  Heat small non-stick saute pan on medium heat.  Spray with non-stick spray.  Add shrimp to pan and season with salt & pepper.  "Fry" for 2 minutes, spray tops of shrimp with non-stick spray and turn them over to cook other side.  They should be pink and bright white.  Add garlic to center of pan and cook until heated through.  Turn heat off and add applesauce and orange mixture.  Stir until shrimp are well coated and serve over a salad, rice, noodles, or wrap in lettuce leaves.

Monday, April 18, 2011

Chicken Taco Pasta Salad


1 lb. box of Campanelle Pasta
1 red bell pepper, diced
1 green bell pepper, diced
1 medium sweet yellow onion, minced(reserve 1/4th to blend with dressing)
2 cloves garlic, pressed
2 cups frozen yellow corn(try grilled)
1 can black beans, drained & rinsed
1 can kidney beans, drained & rinsed
3 grilled boneless, skinless chicken breasts, diced

Dressing:
1/3 cup white wine vinegar
1/3 cup olive oil
Zest and juice of one lime
¼ cup light mayonnaise prepared with olive oil(heart healthiest)
1 packet of Splenda or other zero calorie sweetener
1 Tbl. Chili powder
1 Tbl. Cumin powder
½-1 cup Pineapple-Peach Salsa
Kosher Salt & Fresh Ground Pepper to taste
Cilantro(dried or fresh, to taste)

Prepare vegetables while you are cooking the pasta according to directions.  Combine vegetables, beans, & chicken in large bowl.  In a blender puree dressing ingredients and 1/4th cup minced onions, set aside.  When pasta is done, drain and rinse with cold water to stop cooking process and cool.  Add to veggie/chicken mix in large bowl.  Top with dressing, kosher salt, cilantro(I used freeze dried), pepper, and mix well, until all is coated.  Serve with optional toppings such as:  grated cheddar cheese, avocado, diced tomatoes, olives, sour cream, salsa, fresh cilantro, etc….

Makes 20 large servings = WW 5 points plus

Saturday, April 16, 2011

Nutella Cake Pops

Sorry, no pictures!

1 Box of Triple Fudge Chocolate Cake, prepared as package directions.
1 small jar Nutella(13 oz.)
2 containers Chocolate Hazelnut Round Wafer Cookies(hint: $ store)
2 packages Milk Chocolate Chips or Chocolate Melting Wafers

Crumble baked, cool cake into bread crumb like consistency in a large bowl.  In a food processor, pulse cookies until finely ground.  Add to crumbled cake.  Add about 3/4ths jar of Nutella and mix with fork.  You want the dough to resemble the texture of Playdough.  Add more Nutella if needed.  This is where I put on food grade disposable gloves sprayed with a little non-stick spray and rubbed in.  Get your hands in there and "play" with it until it is all combined.  Scoop out a ball with a large cookie scoop and roll into a slightly pressed round ball.  Place on a cookie sheet lined with wax paper or non-stick foil  This recipe makes 4 dozen and I needed 2 large cookie sheets.  Melt 1/4 cup of chocolate chips in 30 second increments in microwave.  Dip one end of a lollipop stick in melted chocolate and push about 3/4 way through the cake balls.  Freeze for 20-30 minutes.  In the meantime melt the remaining chocolate, again in 30 second increments in microwave.  Dip each cake pop into the chocolate and place back on cookie sheet.  Allow to set on counter or in refrigerator.  Yum!

Tuesday, April 12, 2011

Orange Roasted Pork

This is my favorite new way to cook pork and even chicken.  I'll assume beef would also be wonderful.

3-5 lb. Pork Roast(or other meat, boneless skinless chicken breast, etc...)
All Purpose Seasoning, such as Pappy's or Lawrys
1 Medium to Large Sweet Onion
2 cloves Garlic, Pressed or Finely Chopped
1 jar Orange Marmalade
1 cup Non-Alcoholic White Wine or Chicken Stock
2 Tbl. Hoisin Sauce
1 tsp. Kosher Salt(or to taste)
1/2 tsp. Fresh Ground Pepper
Sprinkle of Red Pepper Flakes

Rub roast or chicken pieces with all purpose seasoning.  Place meat in a 5qt. crock pot sprayed with non-stick spray.  Slice onions in have lengthwise, trim off ends, and slice into skinny half moons.  Top meat with onions.  In a medium mixing bowl, combine remaining ingredients with a whisk.  Pour over onions and roast.  Cook on high one hour, reduce temperature to low and cook another 5-6 hours. 

I served this over Turmeric Rice. 

Monday, April 11, 2011

Aromatherapy Socks!

I found these at Walmart this weekend.  They are No-Nonsense Aromatherapy Hidden Cotton Liners.  I know, sounds like a feminine product, and kind of smells like one too.  But they're not bad!  After several hours, when I was finally ready to kick off the shoes, they smelled fresh and light.  The Rose scent(white liners) didn't smell too strong at all like some foot powders and sprays.  So, now, my challenge is, for No-Nonsense to market a line specifically for stinky teenage boy socks!  Maybe some Axe fragrances infused.  That would make one happy mom!

Friday, April 8, 2011

Starburst Mirror


When we gave K-Bug's room a makeover we knew we wanted to make this.  I found a great tutorial HERE, at Under the Table and Dreaming.

I printed up her TEMPLATE HERE but didn't glue it to the back, I was afraid the paper might come off the back.  The disk I found to use was about a quarter of an inch smaller than the template so I just marked the edges of the disk I used and then marked the template myself with a Sharpie.  Our itty bitty town doesn't have a craft store, at least not until this fall(squeal), so I asked at our new Lowe's.  When I showed her what I wanted to make she took me over to the garden center and found the perfect 6 1/2" circle for me, it's a coaster used for potted plants.  But this filled the bill perfectly!  I bought skewers from Walmart, .97 cents for a package of 100.  I picked up 2 packages so I could find the most even skewers.  I didn't use nearly as many as Under the Table did, but we didn't want a really full one.


Sort through the skewers to find the straightest ones.  If you have a grouted tile counter top, this works perfect, roll the skewers between the straight tile.  Mark 16 skewers 10 1/4" from the flat tipped end.  Mark 32 skewers at 9" the flat tipped end too.  NOT from the pointed tip, some skewers are not the same length, so you need to measure them from the flat tipped end.

Hot glue the first 16 at each marking, pointed tip in.  What worked best for me was making a small line of hot glue about an inch long, putting the skewer on the glue and twisting it.  If there is too much glue on the side then it makes it harder to align the next length next to it.  I added an extra bead to give it a little 3D dimension so the skewers that were marked at the 9" mark were actually a little raised if looking at the back side of the starburst.  When I flipped it, the longer skewers appeared to be raised.  You'll see....

 Keep gluing until all are fastened down. 

I took it outside and spray painted glossy black on both sides.  When dry, bring it back in and turn right side up.  See how the shorter ones appear to be recessed?

Flip it back over and fill in the skewers with lots of hot glue.  The back won't be pretty, but no one looks there anyways.  Decide which part of the starburst you want to be the top when you hang it on the wall.

I took some framing wire, twisted some loops and bent in half.  Hot glue it to the back.

Then, add even more hot glue.  Turn over and attach the mirror.  I found a grouping of peel and stick mirrors at TJ Maxx for around $6.00.  I think the coaster cost around $4.00, spray paint around $3.50.  The whole thing came to less than $20.00.

ENJOY!!!


Thursday, April 7, 2011

Root Beer Cake Pops


I've been playing with this idea for a while and so my Young Women are my guinea pigs for tonight.  My kids have already sampled them as well and gave them two thumbs up.  Caution:  If you have a sweet tooth, this fits the bill.

1 Package Butter Recipe Yellow Cake Mix
Zatarains Rootbeer Extract(or another brand)
1 tub Vanilla Frosting
2 packages White Chocolate Chips
Lollipop Sticks

You're going to prepare the cake mix according to package directions, except....  Measure water as directed on the box directions, minus 2 Tbl. water.  Replace with 2 Tbl. Rootbeer Extract.  THEN, prepare and bake, and allow to cool completely.  Using a fork break up cake mix into crumbs in a large bowl.  Dump 3/4 of vanilla frosting into crumbs and sprinkle 1 Tbl. Rootbeer Extract evenly over the top.  Mix with fork and then hands until the crumb mixture resembles more of a Playdough like consistency.  I use food prep gloves coated, rub in a little non-stick spray on them or butter.  Use a large cookie scoop to make uniform size balls and roll into balls.  Place on a cookie sheet lined with wax paper or non-stick foil.  Melt 1/3 cup white chocolate chips in 30 second intervals in the microwave and stir well in between(it took me about 90 seconds total).  Dip one end of lollipop sticks in melted white chocolate and push about 2/3 way through cake balls.  Freeze cake pops for about 30 minutes.  In the mean time, melt remaining white chocolate chips, you may sprinkle 1 tsp. canola oil over the top before melting to get a smoother consistency.  Remove one cake pop at a time from cookie sheet and roll in melted chocolate to coat.  Return to sheet and refrigerate or allow to set out on counter for 2 hours. 

I didn't have anything to stand them up, but you could use styrofoam to allow them to dry upright.

You can find rootbeer extract here, at Zatarain's.

Tuesday, March 29, 2011

Bedroom Redo...

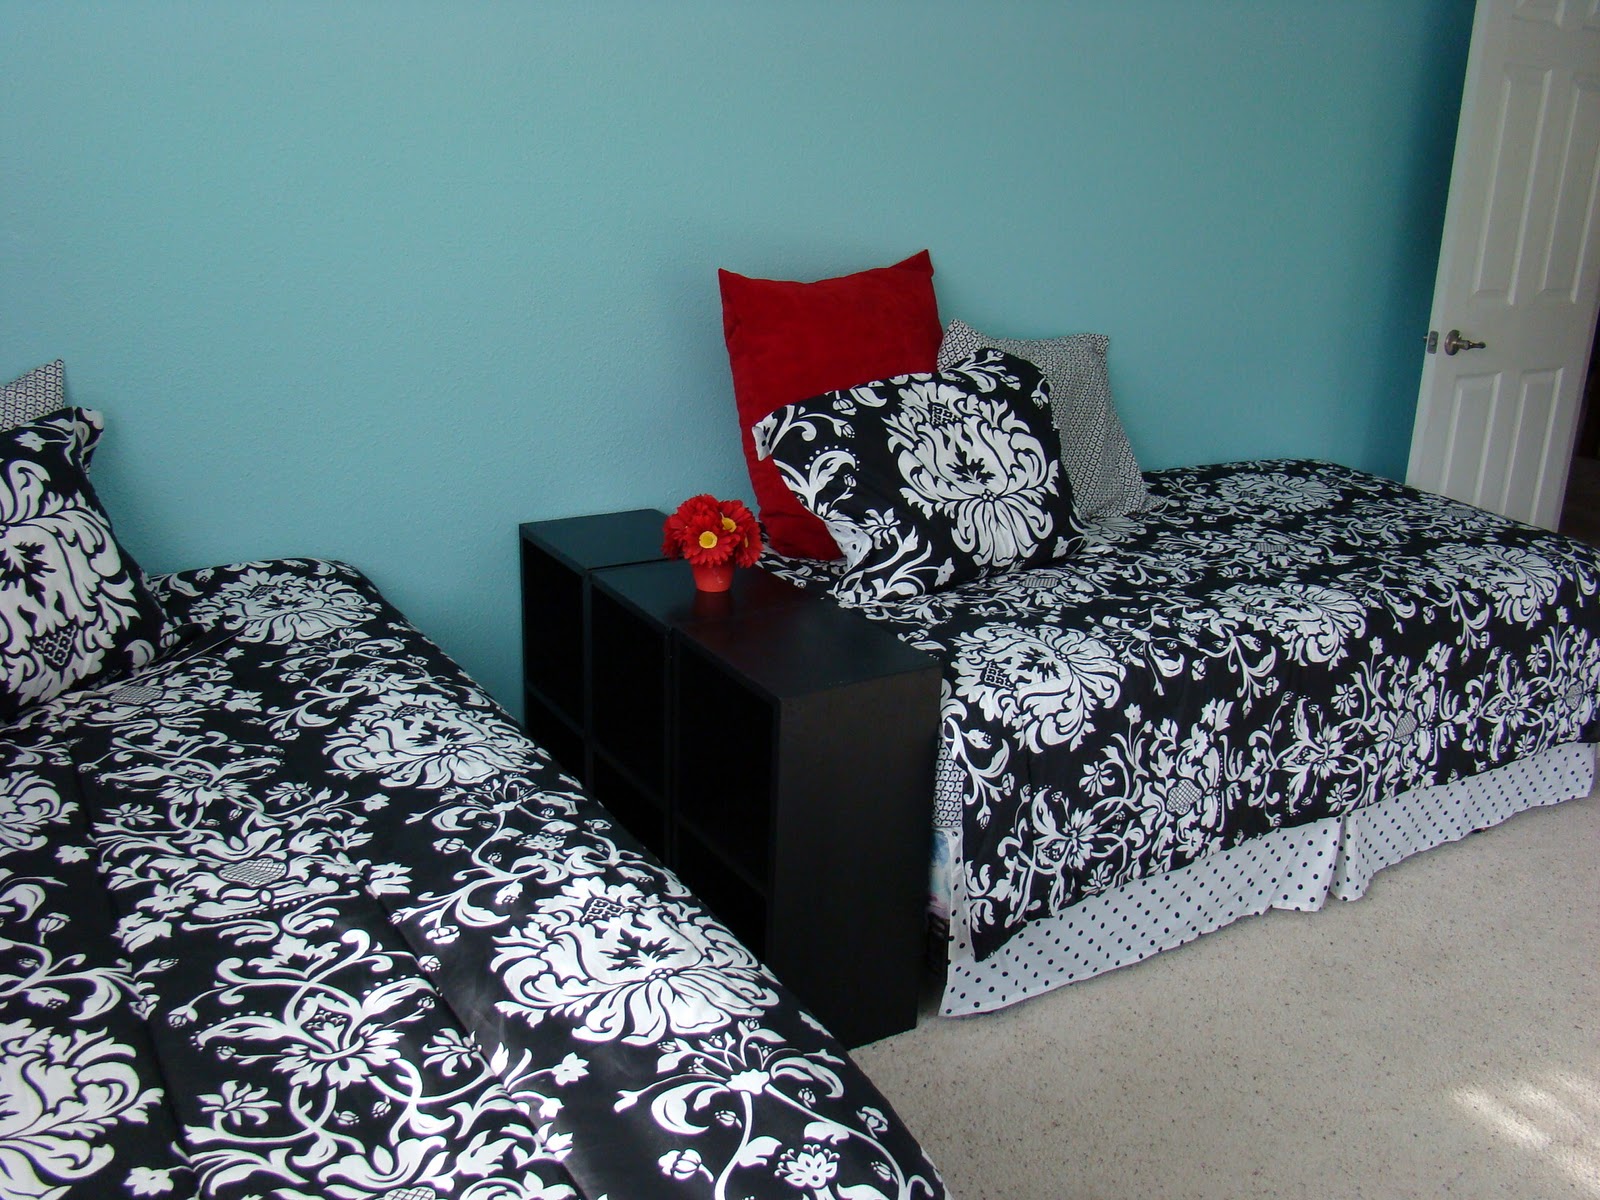
We decided to redo K-Bug's bedroom since the Mermaid moved out.  Deciding exactly what to do has taken time, but we're happy with the results.


After:

 The Reading Nook
New Bedding from Target

No cable in the rooms, but DVDs are allowed.

Repurposed Sconces and Scarves

 
Repainted Cubbies for Nightstand

Lots of bright colors

We made the Starburst Mirror Ourselves
Great Tutorial at Under the Table and Dreaming, and
my own step by steps at Sistas Procrastinate in Style.


During:

Vacuum up all the baseboards and clean them so you can mask them off.

Patch up any big nail holes.  If they're small, the paint will just fill them in.


I like the kind that goes on pink and turns white when dry so you know when it's ready to sand and paint over.

Primed all of the color blocks.

Primed them TWICE!

Before: